Showing posts with label Computer Tips. Show all posts

Tuesday, March 4, 2014

Create a bootable CD or DVD with or without floppy

With the CD-ROM available on almost every computer nowaday, floppy drives become a history. However, for those who find computers a hobby, might run into a situation when they need to create a bootable CD that works just like the old floppy disk. Unfortunately, to do this, you still need a floppy drive to read your bootup floppy disk. Wait, the good news is, you can just down load a bootable ISO image and burn it to a CD. And even better, we have a copy of an ISO image right here. You can download this image and follow the instructions below, or you can do a web search for more options.

The information on this article will guide you step-by-step how to create a bootable CD/DVD, either using a bootup floppy disk or a boot image file. You will end up having a bootable CD or DVD, with CD-ROM driver supported, that could startup your PC and bring up the command prompt. This is going to be a good starting point, then you can run other utilities such as hard drive ghost, etc..

Many current CD/DVD burning software support the bootable feature. If you already have your favorite burning software, look around to find the bootable option. For this article, I will use the steps and sample screen-shots with the burning tool called Nero.

You will need a boot disk (floppy) or a bootable ISO image to start. If you don't have one, you can download an ISO image here. This boot image is Windows-98 based, which means it uses the Windows 98 bootup sequence, which should do what we need. You can also download different boot disk images from the internet. I've found bootdisk.com has a very good collection.

I assume that you already have Nero installed. Also, it is highly recommended to use a rewritable disc so you can redo the process if you have to.

  1. Launch Nero Burning ROM
  2. At the New Compilation Window, select "CD" from the drop-down menu and select "CD-ROM (Boot)" for CD, (or select "DVD" and "DVD-ROM (Boot)" for DVD)


  3. If you use a bootup floppy disk, insert the floppy disk and select "Bootable logical drive..."
  4. If you use an image file, select "Image File" then click "Browse" to browse to the image.

    At the "Open" Window, browse to the location where you saved the boot image and choose the image you wish to use and click "Open" (you might need to change the "Files of type" to "All Files" in order to see files with different extensions.)
  5. Click "New" at the New Compilation Window.
  6. Nero New Compilation Window disappears and Nero brings up its main screen where you can add more files to the CD/DVD if you wish. For example, adding a "ghost" folder with the file "ghost.exe" as follows.
    Once you're done adding all the files you wish to, click on the "Burn" icon.

  7. At the "Burn Compilation" Window, select "Burn"!

How to Format External Hard Drive to FAT32 in Windows

Trying to format a large external USB or Firewire hard drive to the FAT32 file system? Can’t do it? Only see an option for formatting the drive using the NTFS file format? Well if you answered yes any of those questions, then you’re at the right place.
I was recently trying to format my 1 TB MyBook external hard drive in Windows XP to FAT32 instead of the overly forced-upon NTFS format. Why? Well because I needed to connect it to a NAS device and the NTFS permissions were causing the NAS not to be able to access the drive. Simple solution is to use FAT32, no security, no problems. Though it’s sometimes useful to format a USB drive in NTFS format.
Also, formatting a drive in FAT or FAT32 will allow it to be read by other operating systems, such as Mac, Linux, and older versions of Windows such as Windows 98.
Unfortunately, Windows XP and Windows Server 2003 will only format a removable drive in FAT32 if it’s less than 32GB! Hmmm…that pretty much cuts out ALL modern external hard drives!
However, Windows can format a drive that is larger than 32GB in FAT32, but you have to use the DOS command prompt. However, if you have a drive that is 1TB or larger, you may still get an error saying “The volume is too big for FAT32”.
In that case, you can use some 3rd party programs that will allow you to format an external hard drive with the larger size. Let’s go through the different methods. In case you are having problems getting your external hard drive to show up in Windows, read my article on how to change the drive letter for an external drive in Windows.

Format in FAT32 using Drive-Specific Tools

Before we get into using the command prompt and other third-party programs, it’s worth mentioning that some of the hard drive manufacturers have created their own tools for converting a drive which is larger than 32 GB to FAT32. Here is a list:

Format External Hard Drive in FAT32 using DOS

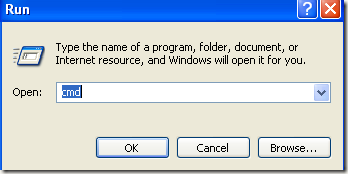
Open a command window by going to Start, then Run and typing in CMD.
command prompt
Now type in the following command at the prompt:
format /FS:FAT32 X:
Replace the letter X with the letter of your external hard drive in Windows. Windows will go ahead and begin formatting the drive in FAT32!
format external hard drive fat32
There seems to also be an issue when using the command line besides the size limit problem. Namely, it can take forever to format the hard drive for some users. Not sure why, but I’ve seen it enough times and it can be very frustrating to wait 5 hours and then have the whole format fail. If the format is taking longer than an hour, just cancel it and try one of the methods below first.

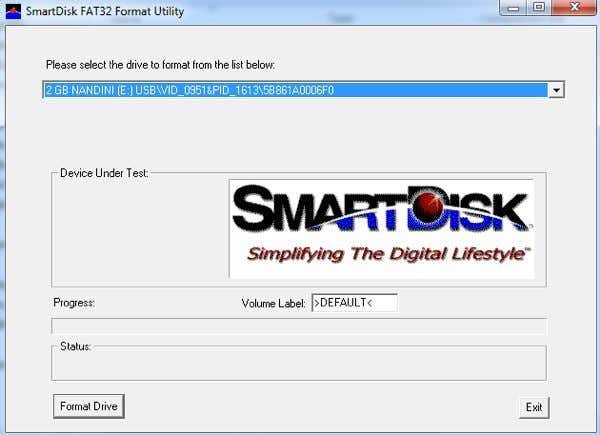
Format in FAT32 using Verbatim SmartDisk FAT32 Utility

There is a free utility called Verbatim FAT32 Tool which will allow you to convert your hard drive to FAT32 in seconds. I use to recommend a program called SwissKnife, which I mention below, but it’s no longer free and no one really needs to spend $10 to convert a hard drive from NTFS to FAT32. There are lots of other free tools and this Verbatim one is one of the better ones.
Just download it, unzip it and run the tool. It’s a standalone EXE file, so you don’t even have to install it on your system. Choose the drive you want to format, give it a Volume name and click Format Drive!
verbatim smartdisk
It’s a painfully simple program to use and it works really well. If you don’t even want to bother with the command prompt, just download this free tool and use it.

Format in FAT32 using FAT32Format

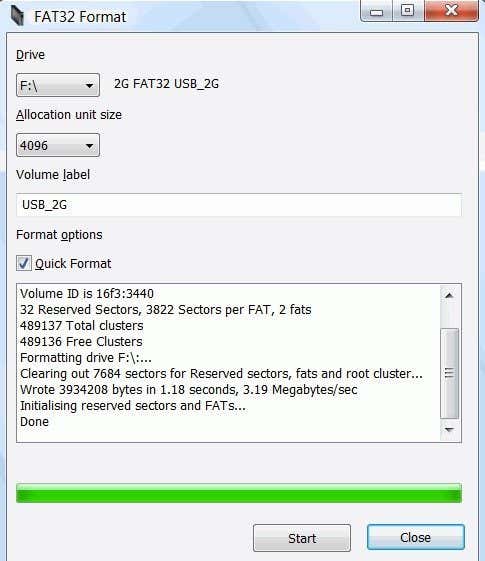
FAT32Format is another free tool you can use to get the job done. Choose the drive, the allocation unit size, give the volume a label, choose whether you want to do a quick format or not and then click Start.
fat32format

I would suggest not checking Quick Format so that way the entire drive is completely overwritten and you’re starting from scratch. I’ve tried this program and it was able to convert my 1TB hard drive to FAT32 without any issues. It did take longer than Verbatim, but I didn’t choose Quick Format, which probably would have been faster.

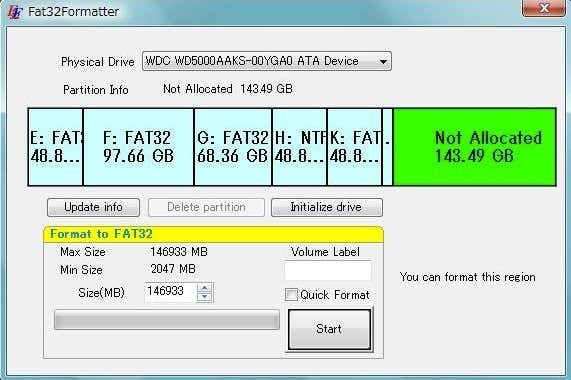
Format in FAT32 using FAT32Formatter

Another option is the FAT32Formatter program from Tokiwa. Using this program, you can see the different partitions on the hard disk and format just one partition to FAT32 instead of the whole drive. It’s probably best not to have a mix of NTFS and FAT32 partitions on one drive, but you can do it if you want or if you need to for some reason. This program will allow you to do that.
fat32formatter

Format in FAT32 using SwissKnife

SwissKnife is a nifty little program that used to be free, but not anymore, which you can use to format many types of external drives such as USB, Firewire, PCMIA, SATA and SCSI. The link points to the CNET page, which still has the older free version you can download. You can also use it to create partitions on an external hard drive and it formats faster than Windows.
swissknife
With SwissKnife, you may run into an issue where after the conversion to FAT32, you are left with only a small percentage of the original disk size. For example, if you format a 1TB drive, you might perform the conversion and end up with only 500 MB of space. This can be fixed by first reformatting the drive in NTFS format by performing a quick format.
Once you format the entire drive using NTFS, make sure to view the available space in Explorer and that it matches the size of the hard drive. Once you do that, go ahead and use SwissKnife to perform the conversion to FAT32.
So next time you want to format a hard drive in FAT32 and Windows only gives you an option for NTFS, make sure to follow one of the methods mentioned above. Enjoy!

How to Change the Drive Letter in Windows XP for an External USB Stick or Hard Drive

This is a guide on how to change a drive letter in Windows XP for an external device. Here’s a common problem that I have seen: Plug a USB flash drive into your computer and it’s says ready to use, but for some reason nothing shows up in the list of drives. Take it out, plug it back in and still nothing shows up!!! What the heck is the problem? Well, it could be several things, but the most common issue is that the drive letter Windows is trying to assign to your device is already taken by some other drive or maybe mapped to a network drive.
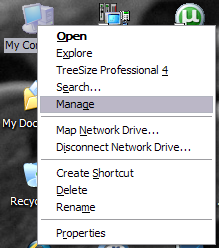
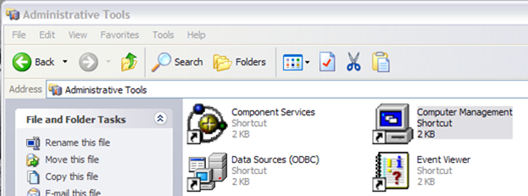
Sadly, Windows XP does not figure this out itself (which is should) and your drive is basically lost in la-la land somewhere. In order to fix it, we need to go to Computer Management and change the drive letter there manually. There are two ways to get to the Computer Management dialog in Windows, one through Control Panel and the second by right-clicking My Computer and choosing Manage.

Right-click My Computer
Computer Management in Administrative Tools
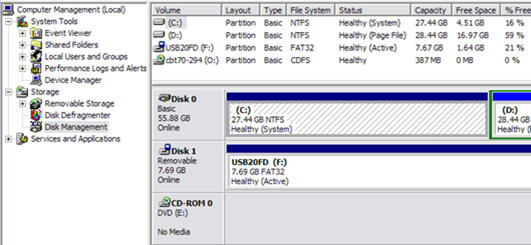
Click on Disk Management under the Storage section and the right side will show you all of the current drives and partitions on your drive. If you don’t know what that means, don’t worry, just find the drive you are looking for in the graphs at the bottom. They are usually named Disk 0, Disk 1, CD-ROM, CD-ROM1, etc. If you’re looking for a USB flash drive, you’ll see the word “Removable” underneath Disk X.
As you can see from my computer, I plugged in a USB flash drive and it’s currently assigned drive letter is F. If you want to change this, right-click in the white space to the right of the drive letter and choose Change Drive Letter and Paths.
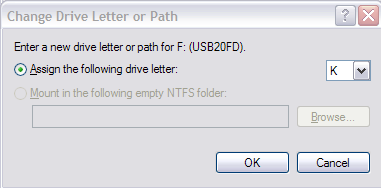
Click the Change button in the dialog box and then pick a new letter from the drop-down list. Just for your info, the Mount in the following NTFS folder option is used if you had right clicked on an external hard drive and instead of giving it a drive letter, you wanted to just have it show up as a folder on your current hard drive. That means you could create a folder in My Documents called pictures that actually points to another hard drive instead of one where all of your My Documents are currently stored.
Click Ok twice and your drive should now have the new letter assigned. Usually, if you USB stick was not showing up before, once you change the letter, it will automatically pop up and ask you what you want to do. And that’s about it! You can also use Disk Management to format disks, determine the type of File System, and see the amount of free space available.

How to Format USB Drive and Memory Stick with NTFS

If you have ever tried to format a USB thumb drive or memory stick, you may have noticed that the only options you get are FAT and FAT32 file systems. This is the default behavior in Windows XP. However, with some slight tweaking of settings, you can actually format your removable storage devices in NTFS format, including external hard drives, etc.
Of course, there is a reason why Windows defaults the formatting of removable storage to FAT and FAT32. There are actually a few advantages and disadvantages to formatting a USB drive in NTFS format, so we’ll go through those before actually talking about how to do it.
The advantages of enabling NTFS of removable storage devices are mostly security related. For example, an NTFS file system lets you to add allow and deny permissions on individual files and folders for specific Windows users, something you cannot do in the FAT file system. But that’s not all in terms of security. You can also encrypt files using Windows XP’s built-in encryption.
Other benefits include the ability to compress files and therefore save space on your USB drive. You can also set disk quotas and even create partitions! Formatting USB drives in NTFS has several advantages that would be good if you need to use some of these advanced features, i.e. for your IT department or if you’re just paranoid!
However, there are also a few drawbacks to using NFTS on a USB drive. Firstly, there is a lot more writing to the drive that is required when using NTFS and therefore your access to the device will be slower. Will it make a major difference that would prevent people from using it? Probably not, but it’s something to consider. Also, versions of Windows older than 2000 cannot read NTFS file systems, nor can most Linux systems.
The other major downside is that if you encrypt your files on the USB drive, you will not be able to open them anywhere else. Actually, this can be considered a downside or an upside depending on what you want to do. If you want to secure your USB stick so that only your user account on your one computer can open the files, then encrypting is perfect. If not, then do not encrypt the files.

How to format USB drive with NTFS

First, connect your USB device to your computer. Then right-click on My Computer from the desktop and choose Manage.
manage my computer
Next click on Device Manager and then expand out Disk Drives. You should see your USB drive listed there as “Generic USB 2.0 USB Drive” or something similar.
usb disk drive
Now right-click on the USB drive under Disk Drives and choose Properties. Then go to the Policies tab.
optimize for performance
Now you will see two options, the “Optimize for quick removal” selected by default. Go ahead and change that by selecting the “Optimize for performance” option. This enables writing caching on the drive and therefore allows you to format it as NTFS! Sweet.
That’s it. Now click OK and then go to My Computer. Right click on the drive in My Computer and choose Format. In the File System drop down you will now see the option for NTFS!
file system ntfs
You can now secure your USB flash drive or external USB hard drive in any way you like! Enjoy!

How to Fix "Missing or corrupt NTFS.sys" Error in Windows XP

One of my XP SP2 computers at home crapped out today with the error “Missing or corrupt Ntfs.sys” and would not get past the initial BIOS screen. I eventually got it back up and running without having to format the computer, but it took a little while and it wasn’t super straightforward. So if you are getting this error, here are the steps you can take to fix it.
The exact error message that you get from Windows is:
Windows could not start because the following file is missing or corrupt: System32\Drivers\Ntfs.sys
When you do a search in Google for ntfs.sys is missing or corrupt, the first result is from Microsoft Support. In particular, it states you might get this message when you convert your hard disk from FAT to NTFS. That was not the case in my situation. I tried to run defragmenter and it froze in the middle. After restarting, I got this message.
I’ll explain their method first (which did not work for me) and then two other methods to fix this issue.

Use the Recovery Console to replace Ntfs.sys

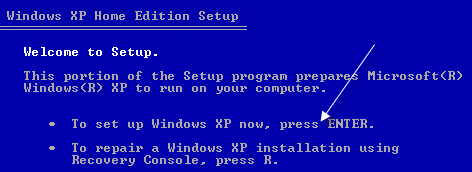
Pop in your CD into the computer and boot off the CD when prompted to “Press any key to boot from CD“. When the Welcome  screen appears, press R to select the To repair a Windows XP installation using Recovery Console, press R option.
repair installation
Next, type the number for the installation you want to logon to from the Recovery Console. You’ll also need to know the administrator password in order to get to the command prompt.
recovery consol
Now that you are at the command prompt, you need to enter in the following DOS commands, pressing Enter after each one:
cd \windows\system32\drivers
ren ntfs.sys ntfs.old
This basically renames the current ntfs.sys file to something else so that we can replace it with a new one that hopefully is not corrupted. Now type in the following command:
copy cd:\i386\ntfs.sys drive:\windows\system32\drivers
Where cd is the drive letter for the CD-ROM drive that has you Windows XP CD, and drive is the drive where you installed Windows XP (most likely C:).
That’s it! Now go ahead and remove the CD and type quit. Go ahead restart your computer and see if you are able to log back into Windows!

Fix Ntfs.sys error by using CHKDSK

For some reason the above-mentioned method did not work for me! I think it was because the file itself was not an issue, but that there were some problems with the hard drive itself. So after trying to copy the new Ntfs.sys file from the CD and that not working, I thought I would try to run CHKDSK.
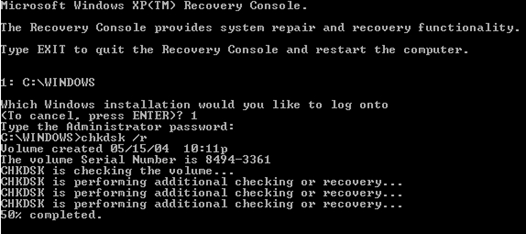
You can run CHKDSK from the Recovery Console itself. So you would follow the same instructions as mentioned above, but instead of typing in the three DOS commands above, you would type in the following at the command prompt:
CHKDSK /R
The /R is a command line switch that says to repair any errors that are found on the hard disk automatically. CHKDSK can take quite some time to run, so be ready to wait. It took about 30 minutes on my computer.
Luckily for me, there were several errors on the disk and CHKDSK fixed them all. I restarted the computer and Windows loaded fine, no missing ntfs.sys error!
chkdsk

Repair Ntfs.sys by doing a repair install of Windows XP

If none of the above-mentioned methods worked, you can try to do a repair install of Windows XP, which basically replaces all of the Windows system files. Your applications and settings will remain intact, but you will have to reapply all Windows updates.
Doing a repair install is pretty easy, the starting steps are the same as for getting into the Recovery Console, but instead of pressing R to repair, you press Enter to setup Windows.
setup windows
Then you simply select the installation you want to repair and press R to start the repair.
repair install
Note that it may look like Windows is actually re-installing a fresh copy of itself, but this is not the case! You’ll see the install screens like if you were to do a fresh install, but don’t worry, you’ll still have all of your applications, settings, and data.
Hopefully you now have a working computer! If you are getting stuck somewhere, etc, post a comment and I’ll try to help you out! Good luck!

How to Connect Your Laptop/PC/Computer to Your TV

This article will teach you how to connect your PC or computer to a TV or HDTVusing wired and wireless connections. You have many options these days, so it really depends on your hardware and budget. The most common method currently is still by connecting a cable from your laptop to your TV, so I’ll go over those first.
However, if you have bought a laptop like the MacBook Pro recently, then there is a way to wirelessly stream whatever is on your screen to your TV using Apple AirPlay. Unfortunately, there is nothing like that for Windows computers just yet, even with the release of Windows 8. This is one area where it’s advantageous to buy a Mac over  a PC because of the wirelessly streaming feature.

Connect Laptop to TV via Cable

S-Video

s video cable
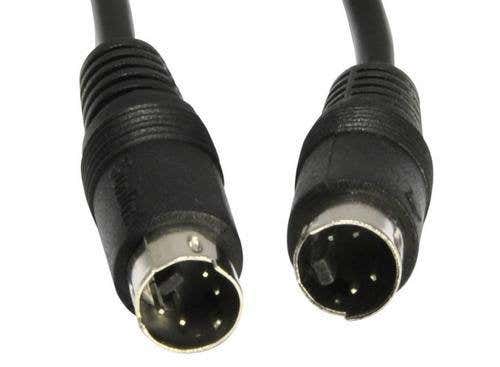
Five years ago, this used to be the most common method for connecting a laptop to a TV because S-Video cables are cheap and just about every laptop and TV back then had a S-Video port. Nowadays, it’s rare to find a laptop with an s-video port, though lots of moderns TVs still include the port. Remember, there are two types of S-Video cables: 4-pin and 7-pin. Most laptops and PC’s are equipped with a 7-pin port, so if your TV only has a 4-pin S-Video port, then this method will not work or you’ll have to get an adapter.
S-Video picture quality is moderate and does not support high-definition video. Also, S-Video ports do not support audio, so you’ll have to buy a separate cable for that purpose. DVI and HDMI are best suited for HD signals.

VGA

vga cable
VGA, like S-Video, was another common port found on all laptops and TVs/computer screens back in the day. Again, you’ll still find the port on HDTVs and monitors, but not on laptops. Most desktops still support VGA and have VGA ports on the back. In terms of picture quality, VGA is bette than S-Video. Also, as with the S-Video cable, VGA cables are very cheap. VGA cables do not support audio, just like S-Video cables.

DVI

dvi cable
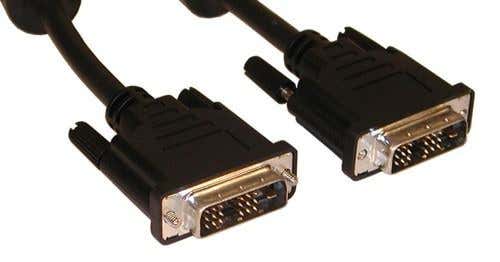
DVI stands for Digital Visual Interface with “digital” being the key word there. The digital signal will give a higher quality picture than either S-Video or VGA. Of course, your computer will need to have a DVI connection and your TV will need to be an HDTV. DVI cables used to be expensive, but now you can get them for $5 to $10 online. Also, DVI cables to do not support audio either, so you still need a separate cable for that.
DVI cables are also a bit complicated as you have DVI-I (Single Link), DVI-I (Dual Link), DVI-D (Single Link), DVI-D (Dual Link) and DVI-A. The reason why DVI became popular is because it supports analog connections also, namely VGA. You can buy a DVI to VGA adapter to convert between a DVI output and VGA input, etc.

HDMI

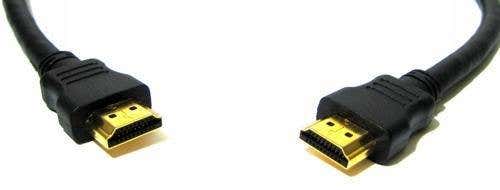
hdmi cable
HDMI (High-Definition Multimedia Interface) will give you the best quality picture on a HDTV. Even though HDMI is very popular, a lot of laptops still do not come with HDMI ports built-in. Luckily, HDMI is compatible with DVI, so you can get a HDMI to DVI cable to connect it to your HDTV. Unfortunately,  HDMI cables are pretty expensive these days. You can buy cheap ones, but you may not get the same quality picture as a more expensive cable.
There are also many versions and types (A thru E) of HDMI cables that support different features like audio, 3D over HDMI, Ethernet, and 4K resolution support. The best part about HDMI cables is that you get high-definition video and audio passed through the cable, which makes it very convenient when connection a laptop or PC to your HDTV.

DisplayPort

displayport cable
DisplayPort and Mini-DisplayPort are very similar to HDMI and DisplayPort is meant to complement HDMI, not replace it. The basic advantage to DisplayPort is that it can support up to 4 video and audio streams across one cable. That mean you could connect up to 4 monitors at 1920×1200 or 2 monitors at 2560×1600 pixels.
HDMI is still more popular, but you’ll find DisplayPort ports on Apple computers, the Microsoft Surface tablets, and even some Windows PCs. DisplayPort is also backwards compatible with VGA and DVI, which is nice.

Connect Laptop to TV Wirelessly

In addition to connecting your laptop to your TV using a cable, you can also wirelessly project your laptop display on your TV using new wireless technologies. I’ll mention a couple of the different technologies that currently exist and explain what hardware is needed. Unfortunately, the main reason wireless streaming of laptop and desktop displays to TVs has not become ubiquitous is because of the extra cost of the hardware needed.

Apple TV

apple tvIf you have a MacBook Pro,  MacBook Pro, MacBook Air, Mac Mini or iMac that is from 2011 or later, you can wireless stream your Apple laptop or desktop display to your TV using an Apple TV in full HD. The Apple TV is a separate hardware device that cost $99. Since only a few of the most recent Mac computers support AirPlay Mirroring, it’s not very popular.

Intel Wireless Display

intel wireless display
The AirPlay feature that is supported on Macs is one feature that has been missing on Windows computers for a long time. Luckily, things have changed and Intel has come out with a technology called Intel Wireless Display (WiDi), which lets you stream your laptop screen to an HDTV wirelessly.
Of course, the main downside with WiDi as with AirPlay technology is that it’s relatively new and therefore you can only use it if you have a PC that supports WiDi. If you’re planning on buying a new PC soon, you should look into whether the feature is supported or not as it can make streaming your laptop or PC screen to your HDTV relatively easy.
There are only a couple of HDTVs that support WiDi right now, but you can buy an adapter for any HDTV that will let you stream content to that TV from a WiDi enabled device.

Wireless Kits

If you don’t have any of those technologies built into your computer or want something that’s not proprietary, then you can buy wireless computer to HDTV kits. There are quite a few of these out there and I’ll link to some of the popular ones I’ve heard about myself.
Imation Link Wireless HD Audio/Video Extender - Supports up to 720p for video and can transmit audio also. Requires DisplayLink software, which is available for Mac and PC.
Veebeam HD – This kit supports 1080p wireless HD video and digital audio.
Netgear Push2TV – This works with the new Intel Wireless Display technology I mentioned above and needs a PC that supports WiDi. It doesn’t support the Mac OS at all as of right now.
So those are your options for connecting your laptop or PC to your TV via wired connection or wirelessly. The fastest and most reliable way is still via cable, but you if your computer supports the latest AirPlay or WiDi technology, you’ll be good to go. The wireless kits use sub-par technology and won’t give you as good results as the other technologies mentioned. Enjoy!

How to Remove, Crack, or Break a Forgotten Excel XLS Password

Have you forgotten your Excel password for a workbook or sheet? Or has someone left your office and they forgot to unlock an Excel workbook with a password set on it? If you’re stuck with an XLS file with a password that you need to break or crack, you can try out a small little utility that just might be able to get you back into your Excel file.

Remove Excel Workbook/Worksheet Passwords

Excel Password Remover 2007 is a freeware program that you can use to remove/crack/break/unlock a password on an Excel workbook or sheet. However, you still have to be able to open the file itself. If the file is protected in that you cannot even open the file without typing a password, I’ll mention another program that you can use to crack that Excel password.
However, for most Excel password protection, it’s usually on the workbook or sheet so that someone can view the file, but not make structural changes to the file or changes to the cells. If this is your case, download the add-in and double-click on it. Excel will open and you’ll be asked whether to enable or disable the macros associated with the add-in. Of course, enable it.
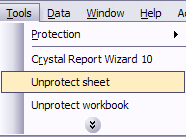
Then go ahead and open the Excel workbook that has the password on it that you would like to get rid of. There will be two new menu options under Tools, called Unprotect Sheet and Unprotect Workbook. Note that you can also open the workbook first and then double-click on the add-on to get the new menu options.
crack excel password
I created a test workbook and protected both the sheet and the workbook with a simple password at first. The program worked perfectly and it removed the protection very quickly!
remove excel password
However, I decided to see how well it worked with a fairly complex password set to the workbook! I used 9 character password that had a combination of uppercase, lowercase, numbers and a symbol to put the Excel password remover to the test and I was quite surprised that it actually managed to crack it after about 2 minutes! Not bad at all!
What’s really surprising is that you can break a password of any length using this add-in for all versions from Excel 97 to Excel 2010. I also used a 17 character password that has numbers and symbols and it was cracked in about 5 seconds. Why so fast and why doesn’t it matter how complicated the password is? Unfortunately, the password is only as safe as the amount of encryption used to store the password.
The encryption is weak in Excel and therefore passwords can be easily cracked no matter how complicated or how long they are. If you’re using the Excel 2007 or 2010 add-on, you’ll see a new tab called Straxx and three options: Unprotect sheet, Unprotect workbook and Unprotect all. The last one is for the PRO version only, which you have to pay for.
excel crack password

Remove Excel Protection and Remove VBA Passwords

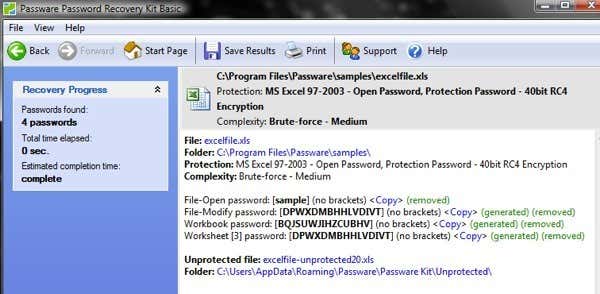
Now if you’re trying to crack the password that is needed to open the Excel file itself, you will have to try out some other programs, which unfortunately are not free like the one above, however, there are your best chance at getting into that Excel file.
For Excel 2003 and earlier, the password to open the file can be cracked instantly. For Excel 2007 and above, the password to open an Excel file is stored more securely than the workbook and worksheet passwords and therefore can’t be cracked instantly, but has to be done using normal brute force dictionary attacks, etc.
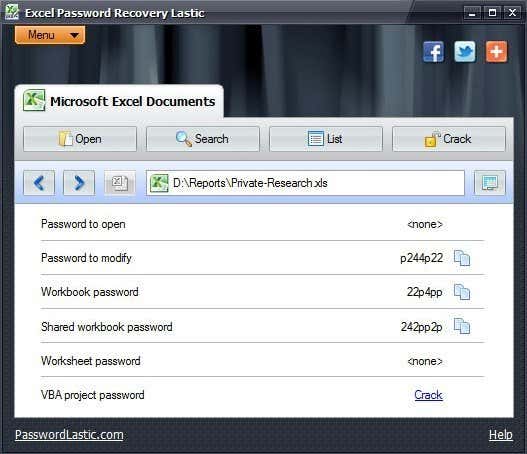
Excel Password Recovery Lastic will not only remove or recover worksheet and workbook passwords, it’ll also recover the password to open an Excel document and VBA project passwords too. Not only that, but you can specify a directory and the program will scan all Excel files in the directory, find all passwords in each document and crack them for you.
excel password lastic
The program will set you back $29.95, so it’s only worth if you really need to gain access to an important Excel file that is password protected. Like I mentioned earlier, though, this program can crack any password associated with an Excel 2003 or earlier file no matter how long or how complicated it is. It cannot however remove the password to open for Excel 2007 and above, do don’t buy this program if you need to do that (Check out the one below). Here is a chart on what the program can and can’t do and for which version of Excel:
excel password cracker
Excel Key also recovers all types of passwords for Excel spreadsheet files including sheet, workbook, file open, etc. This program also works up to Excel 2013, the latest version of Excel. In addition, it also has methods for attempting to crack an open file password for Excel 2007 and above. You can download a demo of the program that will only display the first three characters of the password, however, this might be enough to jog some people’s memory! If you still can’t remember, you can buy it for $39.
excel password recovery
The program has 9 built-in dictionaries for performing brute-force attacks, though you should know that the program will only be able to check about 400 to 800 passwords per second on an average PC. This may sound like a lot, but for a very complex password, it means the program may never be able to crack the password. Again, this is only for the open file password on Excel 2007 and above.
If you need to crack an Excel VBA password, you should check out VBA Key from the same company. It supports all office products including Word, Excel, Access, etc for VBA password recovery. It also supports multilingual passwords. It also costs $39.

Online Excel Cracking Tools

If you can’t get your Excel 2007 to 2013 password cracked using the tools above because it’s going to take too long and the password is too complex, you can try some online tools that can try about 1000 times as many passwords in a second as your home computer can. Pricing varies by site and which options you choose.
online password recovery
Here are two other online Excel password recovery tools you can check out:
Hopefully, one of the tools above will get you into your password-protected Excel file! Any other Excel password recovery tool you use that you would want to mention? Post a comment! Enjoy!